Checklist Edit Template Screen
Last updated: June 19, 2026
Creating a Checklist Template
The L2L interactive Checklist Template enables the recording of data and task completion electronically inside L2L. This allows a site to leverage L2L reporting tools to recall and report on Checklist data, making them a powerful tool for managing processes and identifying opportunities for improvement.
Checklist Template Overview
The top section, (Name, Category, Description), will be pre-populated from the Document Detail Screen. The number will be generated when the Document Detail Screen is saved. The dash followed by a number is the revision number.
The next section is dedicated to Production Standard Work and you can read more about that by following the highlighted link.
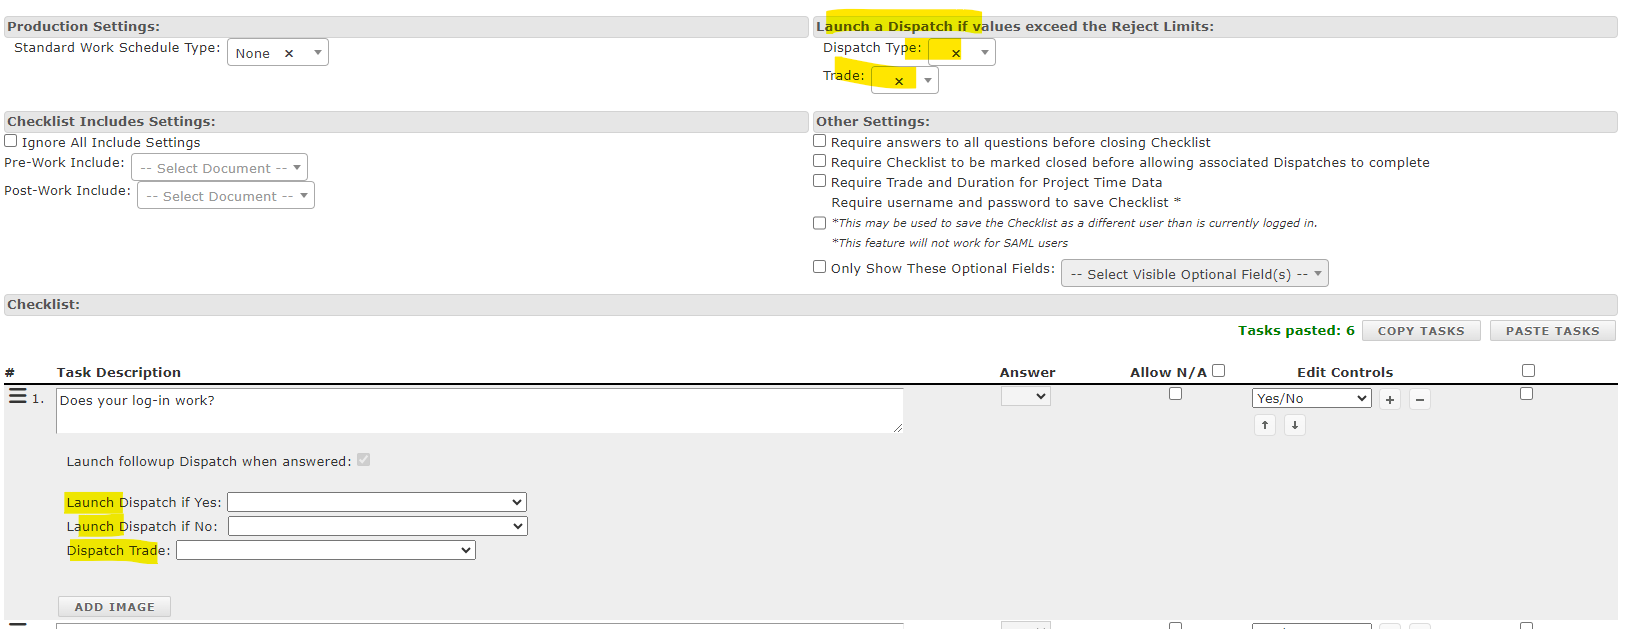
You can require a checklist be completed in order to complete a Product Order.

To the right of the Standard Work, you'll find a place to enter a Dispatch Type and Trade for launching a follow up Dispatch based on Reject Limits found within the tasks of the Checklist.
Checklist Includes Settings: This section is for any pre or post work checklists you'd like attached to this checklist. Checking 'Ignore All Include Settings' removes any site or categorical settings that have been predefined for pre and post work. You can select which checklist documents you'd like to add using the drop downs. These are not required and choosing one, does not mean you need to choose both. If you don't have any checklists created in your site, you won't find anything available in the dropdown.
Checklist Other Settings:
- Check ‘Require answers to all questions before closing Checklist’ if you require all Checklist items to be answered before the Checklist can be closed while filling out.
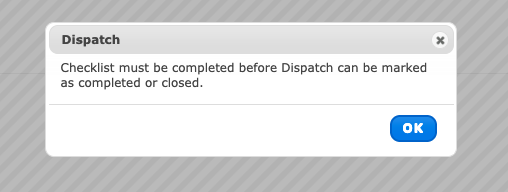
- Check ‘Require Checklist to be marked closed before allowing associated Dispatches to complete’ if you require the Checklist filled out during the Dispatch event to be closed before allowing the event/dispatch to be completed or closed. With this setting enabled, the checklist must be closed before the Dispatch can be marked as completed or closed.
- 'Enable Trade and Duration' brings up a trade dropdown and minutes field in the edit screen of the tasks to enter in how long the task should take and which trade should work on the task. This information then relays to the Labor Summary Report.
-
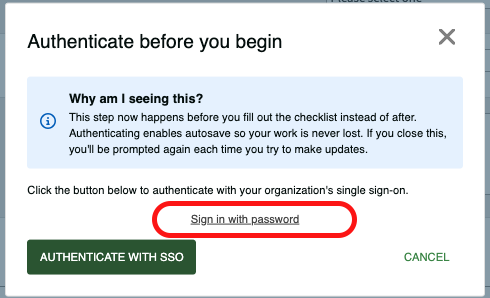
'Require identity confirmation before answering'
Prompts whoever fills out this checklist to confirm who they are before the first question. Doesn't log anyone out — it just records who completed the checklist.For checklists that require identity confirmation, an authentication prompt appears before the first question. This prompt uses the site's authentication configuration to record who completed the checklist and does not log the current user out of L2L.
For a new checklist that’s opened, completed, and closed by the same person in the same session, the user should only have to enter their username and password once in the beginning. After this, they can make updates and mark the checklist closed without needing to enter their credentials again, unless they navigate away from the checklist or click the "Finish Editing" option, which is designed for checklists being filled out by multiple users, as this will then prompt another user to enter their credentials to make their own changes.
If a user ignores, closes, or cancels out the credentials prompt instead of entering their information, each time an update is made, the system will continue to prompt them to input the required credentials, since this is needed to save the updates.
If more than one operator is working on a single checklist, the “Finish Editing” button allows a user to finish their part and save. The system will then ask for the other team member's credentials to continue editing the checklist, ensuring each person’s contributions are digitally signed and tracked.
Please note that there is an option in the site properties to enable SAML Checklist Sub-Authentication as an alternative to Username/Password for SAML-configured users. This can currently only be enabled by L2L Admins upon request.
When this setting is enabled, and a user is configured for SAML authentication, they will see an option to toggle between username/password & SAML authentication when filling out the checklist.

Quick Authentication
To streamline workflows on shared devices, we’ve introduced a Quick Authentication option (Allow name selection instead of password) for checklists. This feature is designed for environments that prioritize operational speed for high-frequency "sign-offs."
Instead of typing a username and password, users can simply select their name from a pre-defined list to authenticate their work. Faster for shared devices, but does not verify the user's password.
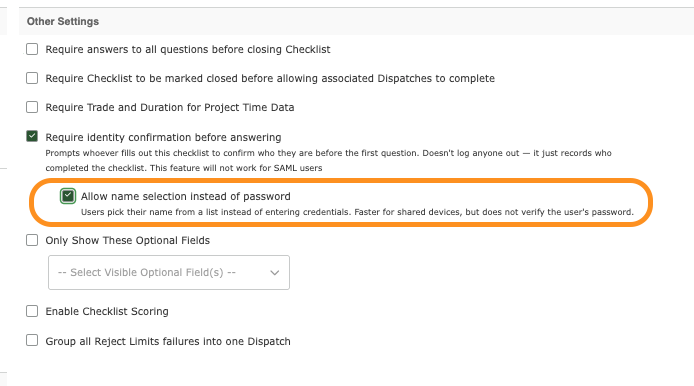
- 'Only Show These Optional Fields' gives the editor the ability to turn off unnecessary fields for the user filling out the checklist. These fields include: Area, Line, Machine together, Technology, Product Order, Build Sequence, Product, and User. Many of these fields will autofill depending on where you are filling the checklist out from (Product Order, Operator Portal). Note: If you are using the auto launch Dispatch on reject limits, the machine must be selected in order for the Dispatch to launch.
-
Enable Checklist Scoring: You can read a more in depth article about this feature here.
- Relaunch Checklist if a question fails
-
Group all Reject Limits failures into one Dispatch: Administrators can configure checklists to group all Numeric Checklist Task Reject Limit failures/violations into a single Dispatch upon completion. This prevents users from being overwhelmed by multiple individual notifications for a single process control event. This behavior is toggleable at the individual checklist level. Admins can choose between the traditional multi-dispatch behavior or the new single-dispatch consolidation based on the specific needs of the process.

Show/Hide Details Button: Pressing 'Show Details' reveals the trade and duration of each item, as well as who completed it and the datetime it was completed. These items are useful for the resource filling out the checklist and are available in read only format on that screen. The set by name and date are populated once the task has been completed. 'Hide Details' removes the extra information from view. The print screen for this page will show the details.
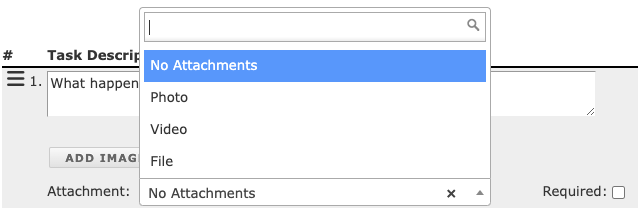
Checklist Tasks: Using the plus button you can add tasks. Once a task is visible, the minus button to the right of the task will remove it if needed. Most of these tasks have the option to allow or require the person filling out the checklist to attach a file, photo, or video (200mb limit) except for table and dynamic table.
- Task Description – Used for entering instructions, does not require an answer (example: safety procedures)
- Short Input – Use for short text answers requiring less than 50 characters: Recommended over Long Input if possible (example: Record fill head pressure) This type can also use a barcode or camera scanner input.
- Long Input – Use for long text answers requiring more than 50 characters (Example: Document condition of Drive Unit)
- Checkbox – Use for when item check off is required
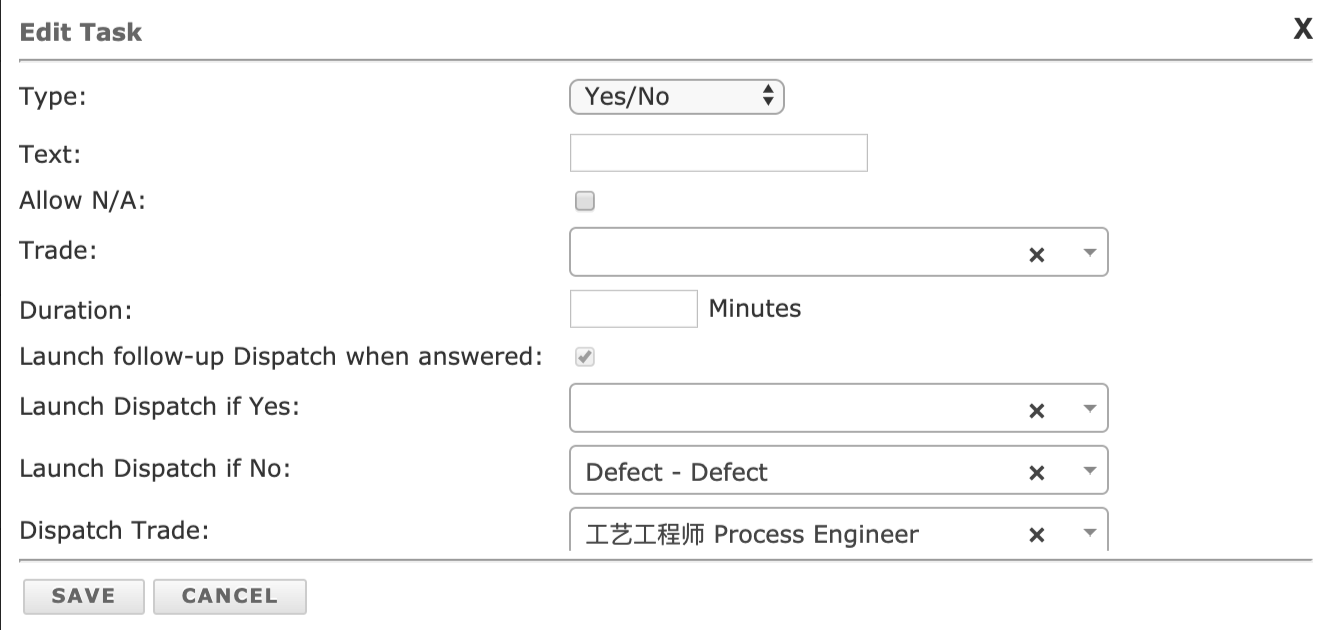
- Yes/No – Use for Yes or No questions (example: Inspect o-ring mark Yes if the condition is good, No if the condition is poor. If no explain corrective action in the comments section). You can auto launch a Dispatch on yes or no criteria by selecting the checkbox in the edit task screen for yes/no tasks.
- Date/time - used for entering a time needed
- Numeric Input - Used to set control and reject limits for values and if the answer is outside the reject limits, the system will launch a follow-up dispatch based on the dispatch type and trade you entered at the top of the checklist page. If you are only using reject limits, you'll see green and red coloring when filling out a checklist. If control limits are set, the coloring will be green or yellow. If both control and reject limits are set, you'll see red, yellow and green coloring. If no limits are selected, no color will appear. (Note: You can edit the terms control & reject from the Document Settings.)
- Drop Down Select - These can be choices that you customize for answer selection. You can choose a Dispatch Type to launch on a given response.
- Hyperlink - Insert a Hyperlink for the end user to click on.
-
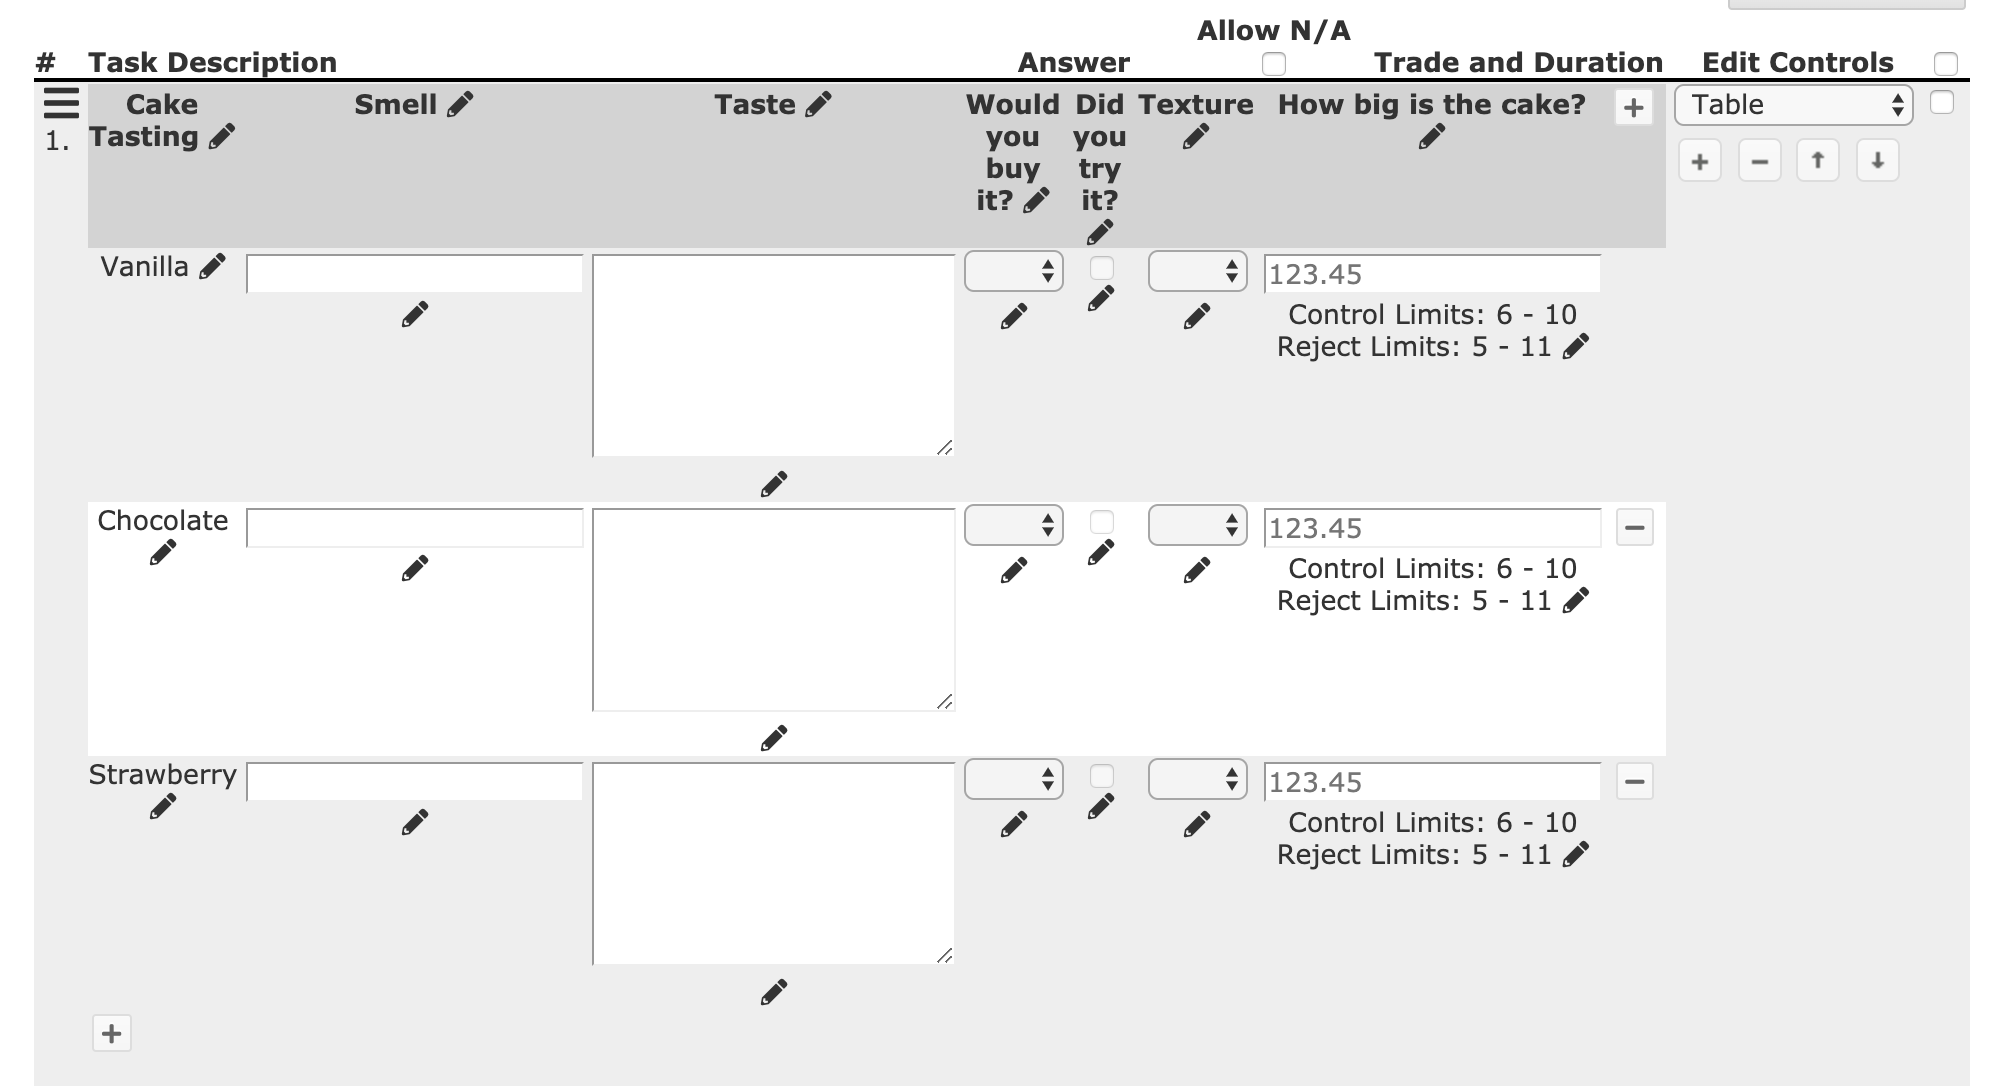
Table Task - This will give you a tabular form to fill out. The first thing you'll see is a column and task description. You can add items vertically and horizontally.
- Key Point: Your tasks will not show up in your reports if you do not name them uniquely. The pencil icon allows you to change the column and text names. See screenshots 1 and 2 below.
-
Dynamic Table Task - The creator of the table task adds columns along with the task type. The person filling out the table, can input additional responses beneath by clicking the +/- buttons. This will create additional rows.
- Key Point: Tables must have unique names for column identifiers so that the reports will be able to separate the data.
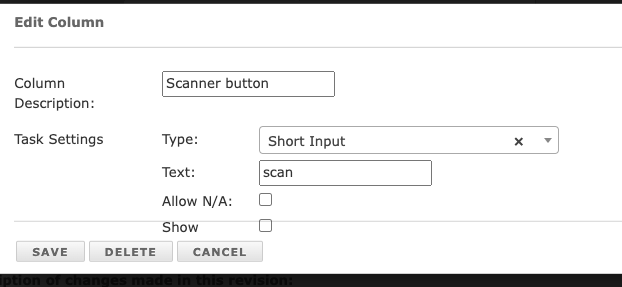
- Editing the columns allows you to separate and name the column description and text for each column of the table. The Show button refers to showing a 'scan' button when filling out the checklist.
- Product Inspection Limits: (must be enabled) This selection will automatically populate inspection limits with retries that are setup through Product Categories and Products. You can read more about that here.
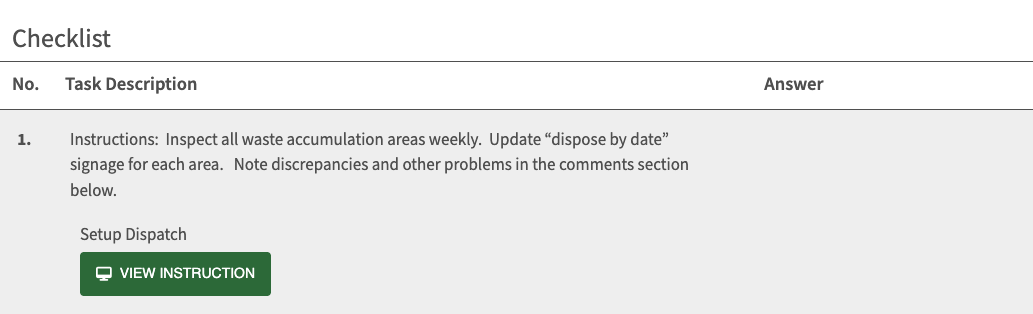
- If you have checklist instructions with Swipeguide enabled; you can add Swipeguide Instructions directly to a task on an L2L Checklist.
Note: You cannot import table task checklist tasks.
Other Key Features: Copy Tasks from one checklist and add them to another if needed. You do this by selecting the task(s) with the checkbox and select the copy task feature. (Be sure to check the box at the end of the task in order to copy tasks) Then open the one you want to copy the task in and select the paste task feature. Drag and drop the tasks to rearrange or reorder them.

Screenshot 1
Screenshot 2
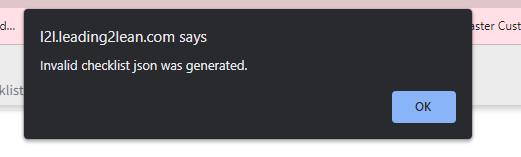
Of note: If you receive an error for "Invalid checklist json was generated," this happens when you have tasks that include the option of launching a follow-up dispatch. These would need to be blank prior to copying or need to be updated once pasted to reflect dispatch types that are available within the site of the new checklist.

Continue further to learn more about Production Standard Work Checklists.