Scheduler Settings & Filters
Last updated: June 19, 2026
In order to start using the Scheduler, you’ll need to set up user administration access
• Go to the Scheduler via the menu tab on the left side of the main screen and click on ‘Settings’
This will open a list of Administrative Users. Only users with Administration rights can add/edit additional users. If the list is empty please contact Leading2Lean to gain access based on licensing contract for site
• To add Administrative Users Click ‘Add New’ located in the upper right corner on the ‘Scheduler Settings’ bar
• Select User from the drop-down list (user must be set up as a user in system)
• Select Scheduler, Manager and/or Administrator
- Scheduler: Can modify existing schedules but cannot alter launch or due dates.
- Manager: Can additionally create schedules and alter launch and due dates.
- Administrator: Can additionally setup permissions and upload schedules.
The scheduler settings will allow you to grant users security access to scheduler functionality and also configure custom scheduler settings for your site.
Default Scheduler Settings
- # Days To Project Schedules: This allows you to determine how many days you wish to project event schedules forward for forecasting needs.
- Default Machine for Tooling: When using tooling in Dispatch, any tooling that is not assigned to a machine will log its dispatch history against this default machine until the tooling is assigned to a machine.
- Enable Machine Cycle Count Update From Production Actuals: If you wish to use cycle based scheduled events, you will need to have this box checked. In addition, you will need to be using our production module. You can find the cycle count multiplier in machine settings.
- Update due date in open Dispatches when due date is updated in schedule: Checking this box will allow the due date in dispatches that have already been launched to be updated when they are updated within the event schedule.
- Update due date on Schedule when due date is updated on an open Dispatch: This checkbox will allow the schedule to be updated from changing the due date on an Open Dispatch.
- Event Shadowing Defaults to On: Event shadowing is a feature that allows you to group multiple occurrence type events for the same machine. If you wish to default to this setting, check the default box. Click here for more information on Event Shadowing.
Highlight Weekdays in Scheduler Calendar View is checked to add more focus on weekdays if applicable.

- When Resuming a Suspended Schedule, Bring the Launch, Scheduled and Due Dates Current is checked, Weekly, Monthly and Yearly Schedules will be brought current based on their Schedule, Interval and Occurrence Types. "Days" and "Hours" based schedules will continue to be resumed by bumping their dates forward based on the number of days they have been suspended. Note: If the Due Date is in the future when you resume the schedule, it will launch, even if the launch date is in the past. For example, if your next launch date is 1/3 and your due date is 1/9 and you resume the schedule on 1/7, the schedule will launch.
- Occurrence Types: Miscellaneous, Weekly, Monthly, Yearly Occurrence Types: Each drop down populates a specific event timeframe which allows you to custom configure font colors for each occurrence type you are using. These colors are displayed on the schedule calendar. Note: It is recommended to only change occurrence colors for occurrence types you wish to use.
Scheduler Security Settings
- Go to the ‘Scheduler’ via the menu tab on the left side of the main screen and click on ‘Settings’.
- To add Administrative Users, Click ‘Add New’ located in the upper right corner on the ‘Scheduler Settings’ bar.
- Select User from the drop-down list.
-
Select the necessary clearance:
- Scheduler can modify existing schedules but cannot alter launch or due dates.
- Manager, in addition to the scheduler, can create schedules and alter launch and due dates.
- Administrator can additionally setup permissions & upload csv schedules.
Schedule top-level filters
At the top of the schedule menu there is the typical filter menu you see on many screens in L2L for the Active, Inactive and ALL so you can sort quickly by these settings but there is also one called 'Empty (No Machines)' and this will allow you to find those schedules that have no machine associated with them. The machine has been inactivated but the schedule remains so you can either add a new machine to this schedule or inactive it.
These filters are also useful when you are troubleshooting the error "A schedule with that name already exists" while editing an existing schedule. In some cases, an older schedule with the same name is hidden because it is inactive or because it no longer has a machine associated with it.
To investigate, search for the schedule name with Status set to include inactive schedules and Empty (No Machines) to locate older duplicate schedules before updating the old schedule name to reflect inactive in its title. Changing the former title will allow you to reuse it on the new schedule.

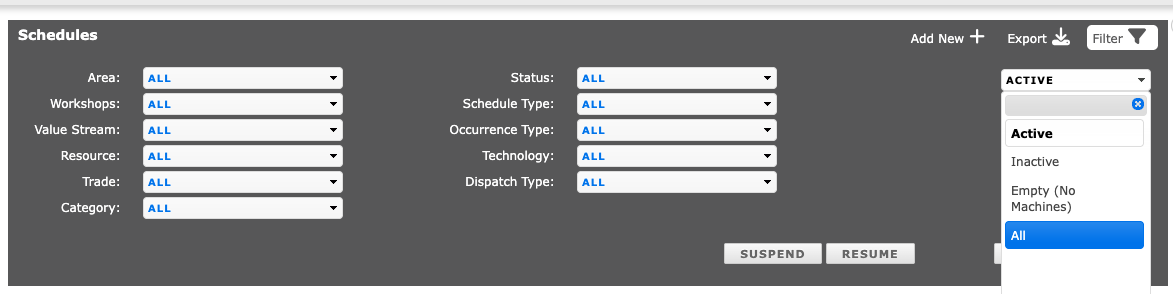
Advance Schedule Filters
With the advanced filter options, you can search down to the level needed to find by grouping the schedules you need to review.

1. The first level is the features to do the following:
- Apply filters: After selecting the filters you want, you must select the Apply Filters option to activate your search criteria
- Clear Filters: This will clear the search field filters to the default of ALL
- Suspend:This feature will suspend all schedules. This can be used during plant-wide shutdowns and you do not want your schedules to launch during this time.
- Resume: This will resume or re-activate your schedules once you return from the plant shutdown.
Note: The suspend and resume feature at this level will be applied to all schedules in your search criteria. If you leave ALL in the filters it will suspend/resume ALL the schedules.
2. This section of the filters is for setting the area(s), categories and who is responsible for those schedules to sort by
3. This section is where you add what schedule type you wish to sort by