Setup - Machines
Last updated: September 23, 2026
Overview
Machines represent the individual pieces of equipment tracked and configured within L2L.
Note: If there is a need to load a large number of machines at once, submit a ticket to L2L Support for help with a mass upload.
Prerequisites & Preparation
Required Permissions: System Manager or Administrator
Step-by-Step Configuration
Navigate to the Menu: Go to Setup > Machines.
Initiate Creation: Click Add New in the upper right corner of the Machines bar.
Enter Details:
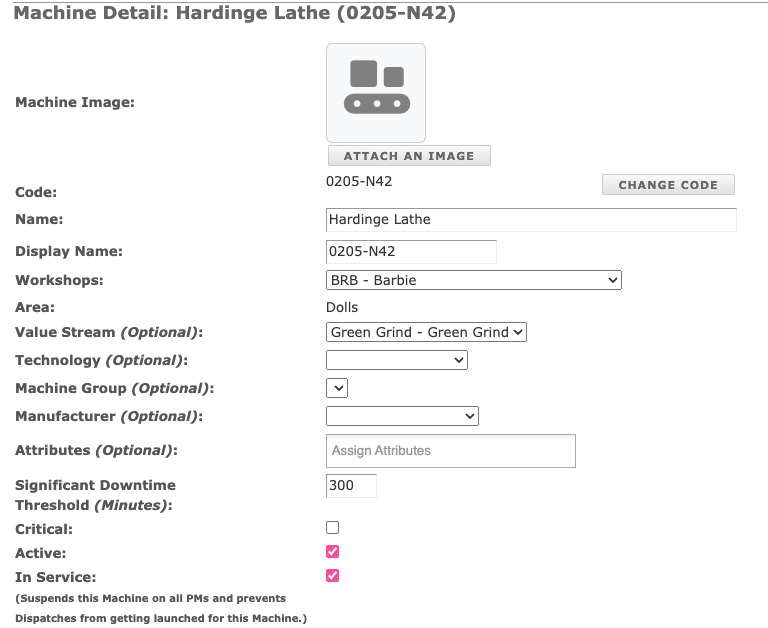
Machine Code: Up to 75 characters. Administrators may change the code later, and the change will be updated throughout the system.
Machine Name: Special characters cannot be used. Choose a name that is common within the workplace and understood throughout.
Display (Short) Name: Up to 12 characters.
Line: Select from the dropdown. The associated Area name should appear below — if not, associate this Line with an Area before proceeding.
Define Attributes:
Value Stream (Optional): Select from the dropdown.
Technology (Optional): Select from the dropdown.
Machine Group (Optional): Select from the dropdown.
Manufacturer (Optional): Configured in System Setup for users with System Manager permissions.
Attributes (Optional): Used to subcategorize Machines — for example, labeling machines aligned vertically vs. horizontally, or CNC machines with different axis counts. Configured in System Setup for users with System Manager permissions.
Significant Downtime Trigger: Enter in minutes. If this value is the same across facilities or areas, use the "Edit Significant Downtime" option in the Setup menu instead.
Critical Machine: Check this box if the machine is considered critical to production.
Status: Select if Inactive; leave blank if Active.
In Service: Only visible if Dispatch Setting > Enable In Service is checked. Unchecking this box suspends the machine on all PMs and prevents dispatches from being created for it.
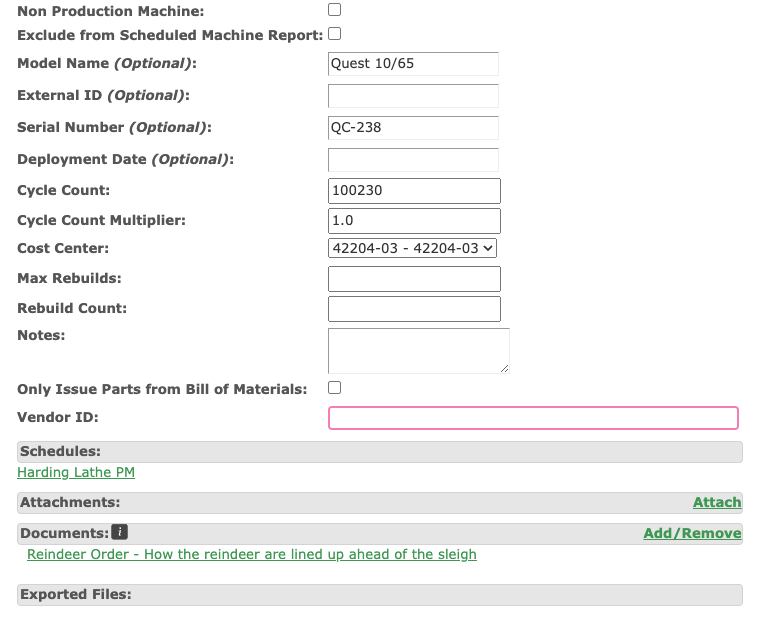
Non Production Machine: Check if the machine does NOT affect production.
Exclude from Scheduled Machine Report: Check if the machine should not be included in scheduled maintenance.
Model (Optional): Enter the model name.
Serial Number (Optional): Enter the serial number.
Deployment Date (Optional): Enter the deployment date.
Cycle/Hour Count: Enter the current count if using cycles/hours to schedule recurring dispatches (PMs).
Cycle Count Multiplier: Used for machines that make multiple cycles per product, or produce more than one product per cycle (since counts are pulled from Production module data). Set to "1" if the machine produces a single product per cycle.
Cost Center: Select if Machine Cost Centers are set up (SAP).
Max Rebuilds: Enter if applicable.
Notes: Enter any additional notes.
Issue Parts from Bill of Materials Only: Select if applicable.
Save & Finalize: Click Save.
Note: After saving, return to the Edit screen to enter information in the Custom Properties field.