📕 Production: Settings
Last updated: June 19, 2026
The settings are where you add what features of the module you want to enable for use for your site. It's also where you can add the role definition of a planner and set the calculations for the metrics. As well, this is where you define which metrics are selected to be displayed in the operator portal and dashboards.
Default Pitch length: This is where you can set the time that you want to measure your takt time to pack out a container or measure your pace of the production run. In the example below, it is set to 60 minutes (1 hour) to set a time interval to measure demand vs actual.
Operator Portal Settings
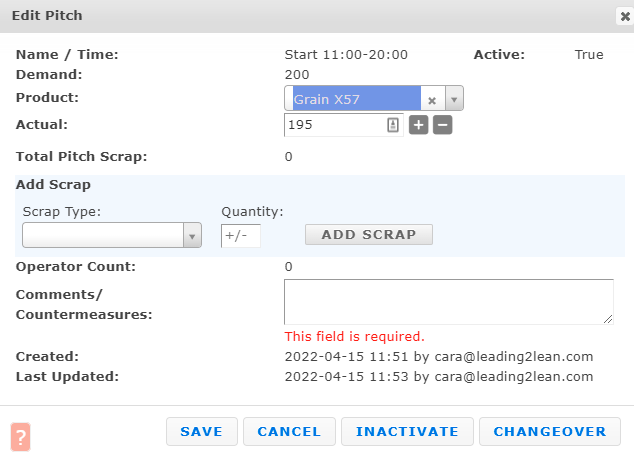
Require a comment if Actual is less than Demand: This option will force the operators to insert a comment if they did not meet the pitch demand. Example: the demand is set for 23 and the line produced only 18 that pitch. The system would then require the operator to input a comment or countermeasure. If your site is using integration to populate actuals, and the actual is less than demand, there will be a red exclamation point ( ! ) bubble as an indicator to add a comment.

- Require a comment if Actual is less than Target: This option will force the operators to insert a comment if the actual did not meet the target for the pitch.
- Default filter for selection of the open dispatches in operator portal: These Dispatch types, when selected, will be the ones visible and available for selection in the operator portal screen for operators to use. A good example is 'Machine Down' Dispatch Type would be an appropriate Dispatch Type for Operators to select from the Operator Portal.
- Allow operators to add pitches: With this feature enabled, you have the option to allow the operators to add more pitches to the production schedule. An example of when this would be useful when the option is set to true would be if the line decides to run overtime, but the schedule was not planned for the overtime period, extra pitches could be added.
-
Changeover Dispatch type: When using the changeover functionality in the production module, you can set the changeover Dispatch type you want to record in both the Dispatch History and Production Reports. When you click the "Changeover" button on the Operator Portal, the system will automatically create a Dispatch for you.
- Note: If the planned changeover duration on the Build Sequence is set to 0, the Changeover Dispatch will open and immediately close. If the planned changeover duration on a Build Sequence is set to anything but 0, it will leave the Changeover Dispatch open until the "Complete Changeover" button is clicked in the Operator Portal.
-
Cleanup Dispatch type: When using the cleanup functionality in the production module, you must set the changeover Dispatch type you want to record the activity against for the Dispatch History and Production Reports. When you click the "Start Cleanup" button on the Operator Portal, the system will automatically create a Dispatch for you.
- Note: If the planned changeover duration on the Build Sequence is set to 0, the Cleanup Dispatch will open and immediately close. If the planned cleanup duration on a Build Sequence is set to anything but 0, it will leave the Cleanup Dispatch open until the "Complete Order" button is clicked in the Operator Portal.
- Default the operator count to the value of the last pitch: When enabled, this setting allows the option for the operators on the line to not have to edit the operator count if it's the same as the previous pitch. Note: This feature only works when not using the Current User Check In function.
- Auto-populate the user's first and last name when entering a new Dispatch: This will automatically insert the username of the person who is logged into the L2L account if you select the checkbox.
- Number of product orders that are visible on the operator portal at a time (Site Default): This option is used with eKanban or product order scheduling. This feature, when selected, will show only the number of orders you have selected as the site default. For example, if you only want the next three orders to show on the operator portal, you would set this section to 3. Note: In the line setup menu, you can override this default number if desired for individual lines.
- Number of days to look ahead in the product order queue to display product orders and to change over to product orders: This option is used with eKanban or product order scheduling. When selected, this feature will allow you to set the number of days in the future the operator portal will display orders. For example, if you only want the operators to have visibility to upcoming orders over the next two days, you would add the number 2 in the box for this option. Note: If the number of days to look ahead is a short timeframe and your default number of orders visible on either the site or line setup is large, they may not all appear.
- Cycle Time lookup order when saving a pitch: This setting controls how L2L determines the pitch cycle time, or Ideal Cycle Time, when a pitch is saved and a build sequence is involved. If the setting is Build Sequence First, L2L uses the first available source in this order: Product Order Group, Build Sequence, then LCT Lookup. If the setting is Line Cycle Time Settings First, L2L uses the first available source in this order: Product Order Group, LCT Lookup, then Build Sequence. Note: this defaults to Line Cycle Time Settings First.
- Display the Demand vs. Actual graph on the operator portal: When selected, this feature will display the trend graph of Demand vs. Actual in the lower right-hand corner of the operator portal screen, giving operators visibility to their performance against demand.
- Display pop-up when Standard Work is due: When activated, this feature pops up a dialogue box on the operator portal indicating that Standardized Work is due to be completed. The example below shows how this would look on the operator portal screen. Note: This will turn on and off the pop-up message. If you wish to have the standard work details option enabled, please see the Document Details Section to activate this process.

-
Individual Pitch Threshold basis (Choose how to calculate thresholds for individual pitches): You have three options to set the way each pitch calculates by choosing either one of the following:
-
- TEFF = Pitch Actual ÷ Pitch Theoretical Parts
- PEFF = Pitch Actual ÷ Scheduled Demand
- TARGET = Actual ÷ Target
- In the example below, you will see that PEFF was selected as the calculation for the individual pitch threshold. This is what changes the colors on the Actual (numbers) column in the operator portal. Note: To set the pitch threshold, go to the line setup screen for each line to define. For most customers, these are set automatically as part of the site setup. (Whichever option you choose in the production setting and save, that option will then show in the line setting for the custom colorization)
-


-
Set individual pitches red if the actual exceeds the Maximum Quantity Produced Per Pitch setting in the Line Cycle Time: If you select this option, it allows you to set a maximum pitch actual count that will turn the individual pitch red if the actual exceeds the amount set in the line cycle time screen.
- As an example, you set the Maximum Quantity Produced Per Pitch to 100 in the line cycle time setup screen (shown above). The line is scheduled to run 82 parts per pitch. However, the line actually builds 105 parts during a given pitch. This feature will override the percentage set in the individual pitch settings from the line setup screen, and enabling this Maximum Quantity Per Pitch will turn the pitch red if over-producing has occurred.

- Show the Pitch Target column in the Operator Portal and Pitch Board (Theoretical number of parts that could be produced during this pitch based on cycle time): If selected, this feature will show the target column in the operator portal, displaying the theoretical number of parts that could be produced (based on the number of operators checked into the line and the cycle time of the product) and is used for scheduling production. In the example below, the pitch demand is 255 based on the line cycle time. However, the target value is 96 based on the (reduced) number of operators checked in to the line.
- As an example, you set the Maximum Quantity Produced Per Pitch to 100 in the line cycle time setup screen (shown above). The line is scheduled to run 82 parts per pitch. However, the line actually builds 105 parts during a given pitch. This feature will override the percentage set in the individual pitch settings from the line setup screen, and enabling this Maximum Quantity Per Pitch will turn the pitch red if over-producing has occurred.

- Show Scrap Code in Scrap dropdown: Defect/scrap code in addition to description when adding scrap details in Op Portal/Console
- Apply Planning Rate to Target: With this feature enabled, the target column will use the cycle time with the Planning Rate. With this toggled off, the target column will use the ideal cycle time (cycle time without the planning rate or the 'ideal cycle time' value.)
- Show the Pitch Demand column in the Operator Portal and Pitch Board: The number of parts that should be produced during this pitch based on the schedule is shown in the operator portal when this is selected. This is usually turned on and the pitches have been scheduled based on demand or cycle time. If you elected to turn this off, only the target quantity would appear in the operator portal.
- Default machine is pre-selected in Operator Input and Operator Portal Dispatch Screen: When this feature is activated, the system automatically inserts the default machine into a new Dispatch event so the operators don't have to select a machine. This is useful as a time saver if you only have one machine on the line or you want your most common events to be tied to one machine.
Production Status Dispatch Settings
In this feature, you can set up the system to automatically launch a Dispatch event and send a notification if your metrics go into a red status from the production build for each line. In the example below, if the metrics for PEFF go into red status for the week, then it will launch a Dispatch event for that line under Dispatch event type Production Status. Note: depending what you choose for Time Frame- Week, Day, or Shift, the dispatch launches at the end of that selection.

Note: If you choose to use this feature you will need to do the following:
- Add this Dispatch Type event to your Notifications Management criteria.
- In the setup menu under the line setup, you will also want to activate the line for this feature.
- Remember that the system will Complete the event when it returns to a yellow or green status, but you will need to Close out the event.
Default Operator Fix Screen Settings
- In this feature, you can pre-select the default settings for the operator fix function that is most commonly used to help save time on inputting the event into history.

Start of the Week for Calculating Weekly Stats
- This is where you will set the start of your workweek for production reports and scheduling production. In the example above you can see that it is set for 6:00 AM Monday morning and will calculate the weekly metrics from that set time to current time during the week (below).

- Carry over the previous week Pace metric: This affects the current week's Demand, Pace, & Pitch Pace metrics. It can be turned on for the site and will signal what last week's pace was. In the example below, you will see that the line last week was up 92 parts and this week they are up 200 parts so far in the current week. This will help the lines understand past due, if any, from the previous week and take action to recover in needed. Note: To see last weeks number, hover over the "i" symbol located to the right of the Pace. The Pace Color Threshold comes from the Pitch Pace Threshold that you set up in the Line Setup Screen. Pitch Pace must be enabled in your Production Settings.

eKanban Settings
- Default eKanban Schedule Method: is the place you can set the production schedule either by quantity or by cycle time. (this will set the default in the planning screens)
- Show the Planned Product column in the Operator Portal & Pitch Board: Adds a column to the operator portal to show the planned product next to the actual product. Below is a screenshot of this feature turned on.

- Enable Order Planner Link for Operators: in the operator portal screen if you want them to make adjustments to the planning.
- Allow operators to partially complete orders: This is used when you have a process that does not always end on the demand count of the card and you want to complete the order.
- Allow Operators to overbuild orders: if your process is set to overrun to ensure you make the order rate.
- Show Possible Low Material/ Early Start Warning if Orders are scheduled this many days ahead of Due Date: Enter in a number. The icon notifies users when an order has been scheduled a specified number of days ahead of its designated due date. The intent is to signal users to consider any resource and/or raw material constraints that the early order execution may create, and drive users to adjust the order scheduled date(s) closer to the due date if constraints are discovered. It appears in the Order Planning window on the calendar within an order information block, or potentially you saw it in the eKanban Planning view beside a Scheduled Start date.
- Allow operators to adjust the built quantity for an order when the actual data is supplied via the API: This is used for those who have extra parts to add to the next order. An example is a line was to build product A at 300 pieces but for the overrun they built 310 so the 10 extra parts could be applied to the order the next time you build product A. You can add those 10 parts to the model A card the next time you build that model.
- Use Planned Operator Count for Scheduling: This will take into account the planned operators to set demand on the pitch when using the ekanban planning tools instead of the build sequence planned operator count.
Scrap Settings
- Require a Scrap Category when updating or creating a scrap type: This setting will force the creator or updater of a scrap type to select a scrap category to associate that type to.
Precision of Production Numbers
- This feature you can set the precision (How many decimal points) the numbers will show in both the operator portal and in the reports. In the example, you see that the precision is set to .01 and in the screenshot below you will see the numbers in the operator portal reflect this setting.

Production Labels
- Defect Label: place to set term that all product discard is referenced under, such as "Scrap" or "Rework", based on the specific manufacturing case.
- Cleanup Label: place to set term for post-manufacturing activity performed as part of product order, i.e. "Washdown" or "Clean Up" of production suite or equipment
- Ratio Label: If using concurrent build and you use a term other than ratio when building multiple.
Dispatch Settings

Product Review
Enable Product Order and Build Sequence Review: This turns on the functionality for a 'Reviewer' to mark the Order or Build Sequence as 'Reviewed, On Hold, or Void'. It also enables the pass/fail/warn columns on orders and sequences.
Production Statistics
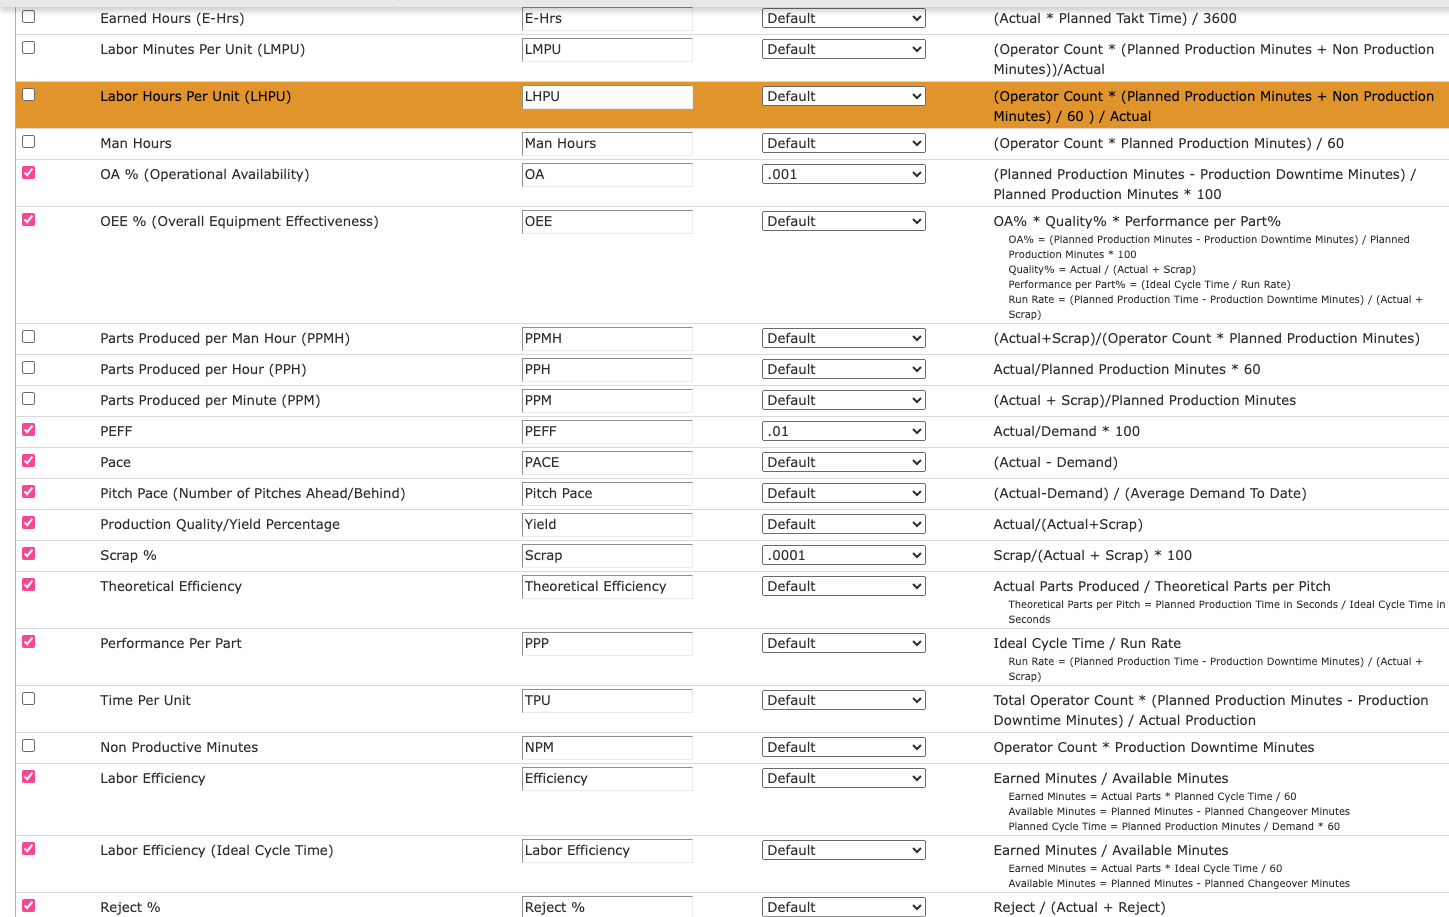
These statistics are the metrics you have to choose from for your plant. You can enable these by clicking the checkbox and by doing so, this will turn on the dashboards and also the metrics in the operator portal. You can find the calculations of the different metrics in the description section of the graph. You can edit the labels to reflect what your site calls each metric. You can also set a precision for each individual metric (different from the default setting). **Of note, if you change the precision setting under Production Statistics for a metric but your Precision Production Number Default under Production Settings is set for example as Whole Numbers Only, be aware your reports will reflect the default setting. **
Security Settings
- Go to ‘Production’ via the menu tab on left side of the main screen and click on ‘Settings’.
- To add Administrative Users click ‘Add New’ located in the upper right corner on the ‘Production Security Settings’ bar.
- Search and select the user from the drop-down list.
- Select the necessary clearance:
- Planner can add and edit the pitch schedule.
- Reviewer can edit the status of a product order/ build sequence to 'reviewed, on hold, or void'.