🎥📕Scheduler - Add / Edit Schedules
Last updated: June 19, 2026
Follow these steps to Add and/or Edit Scheduled Events
- Go to the Scheduler via the menu tab on left side of main screen and click on ‘All Schedules’
- This will open Schedule List - Filters in header can be used to filter list
- Click ‘Add New’ located in the upper right corner on the ‘Schedule List’ Bar
- Enter ‘Name’
- Select ‘Dispatch Type’
- Enter ‘Comments’
- Select ‘Trade’
- Select 'Do Event Shadowing' Event Shadowing Support Page
- Enter ‘Estimated Hours’ This is captured for each interval type with shadowing feature
- Select ‘Owner(s)’ – This is not typically done unless schedule is done by same person every time
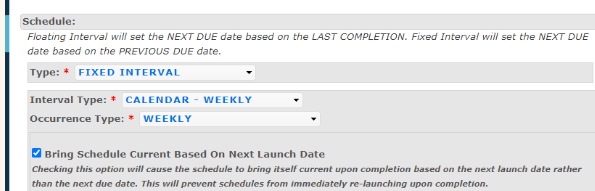
- Select ‘Schedule Type’
- One Time Event = Not repeating
- Fixed Interval = Same frequency regardless when last complete (example: monthly PM due 20th of month will be due every month on the 20th regardless of last time complete)
-
Floating Interval = Frequency will float based on last time complete (example: monthly PM is complete 5 days after due date 20th of month, PM will launch next month 5 days after previous month or 25th of month, this can reduce waste of activities being done to frequently) If you choose Day Of Month for occurence type, this works differently in the way it will cycle forward one month from last completion and then look to see what the Day setting is (Day of Month) and then use that day to set the due date. For example the due date was 09/22 and you complete it on 09/18, the next due date would be 10/22. (We would recommend using Interval Type: Days and then # of days.)
Note: If the scheduled event is not complete before the next scheduled, the system will not launch a duplicate event. If the event is completed after the next scheduled would have been due, the system will account for both events being complete.
- Select (Occurrence) Interval type – Days, Hours, Cycles, Calendar Monthly, Calendar Weekly, Calendar Daily, Calendar Yearly, Calendar Shifts.
-
Note: when the Interval Type is specified as Daily, Hours, or Cycles there is an option to 'exclude weekends' (exclude Saturday and Sunday): whether the subject event schedule should launch events on the subject days of the week. As a note, the weekend days are still counted in the interval period but events will be launched on the next soonest weekday if falling on a weekend day.
- Calendar Type - Shifts: Fixed Interval - This allows the user to set up a schedule using shifts. You can launch the schedule against each shift or choose which shifts. Dispatch will launch at the beginning of each Shift.
- On calendar daily you can add the shift you want this schedule to launch.
- Note if you add the shift to the calendar daily schedule, this will set the next launch date/time as the shift start time and the next due date/time will be the end of shift time. this is automatically set. You can change the next scheduled time during that shift if needed.
- Note: Annual cycles are on a 12 month interval. Monthly is defined by the same day each month.
- Cycle-based schedules have no way of relating to a date, they're launched based on cycle counts. So there's really no way to determine a due date until the cycle_due count is surpassed by the current cycle count on the machine/tooling. So we won't set a due date on the Dispatch until we know (based on the cycle_due and current cycle count) that it's actually past due. We do however, have a feature to estimate due dates. Check out this article for more details.
- You may see the option for Bring Schedule Current Based on Next Launch Date. (note: if you do not see this, its because the setting is not turned on under Scheduler Settings)
- Admins can configure auto-closure settings when creating/editing scheduled events on the New/Edit Scheduler screen. (Default behavior: Auto-close new dispatch, New option: Keep new dispatch open. Newer dispatches can remain visible and completable until manually closed or the configured time expires)
-


Tooling Schedule: Check this box if scheduling Tooling.
You have defined Tooling for your site. Hopefully you are finding Tooling to be invaluable in managing those items that, in general, can be utilized across a range of machines. The Tooling for these machines is likely similar and the Tooling is interchangeable. These are often items that need to be removed, replaced, changed out for repair or calibration: Dies, Molds, Fixtures, Jigs, Gauges, Cutting Equipment, patterns, templates, etc.
Scheduling your Tooling for PMs is a great way to maximize efficiency in managing these assets. Scheduling Tooling for regular maintenance and calibration will ensure that the Tooling you need is always available and ready to go when you need it! You can do this easily through the Scheduler.
Go to Scheduler => ALL Schedules => Add New
Consider adding TOOLING as a Category under Scheduler. This way, you can quickly distinguish Tooling Schedules from Machine Schedules. In which case, you would follow this path:
Scheduler => Tooling => Add New
Create a Schedule for Tooling just as you would create new Schedules for Machines.
Be sure to check the "Tooling Schedule: Check this box if scheduling Tooling" checkbox. You will notice that *Required => Machine List* changes to *Required => Tooling List* when you check the "Tooling Schedule: Check this box if scheduling Tooling" checkbox.


Machine List / Tooling List

- Multiple types can be selected (example: you could schedule the Monthly and Yearly PM from a single scheduler. To do this you will need to identify which steps to perform Monthly vs. Yearly in single PM document, or link both Monthly & Yearly PM Documents to the schedule. When schedule launches it will display the schedule type ‘Monthly or Yearly’ in schedule header)
- Day – Select if you’d prefer launch on same day of Week or Month every time it launches
- Enter ‘Schedule Dates’
- Launch Date – This is the initial date on which the schedule will launch Dispatch event
- Due Date – This is the initial due date following launch date. The idea is to launch event with enough time prior to Due date to ensure success (example: Yearly PM you may want to Launch a couple weeks prior to due date to allow for planning)
- Note: Launch to Due Date interval will remain consistent unless edited from this screen
- Note: When scheduling PMs over the weekend or day off, if the scheduled date lands on a day off, the schedule will push the date to the next working day. If the scheduled date lands on a working day, but the due date lands on a day off, the schedule will push the due date forward the number of non-working days.
- Select applicable machine(s). Use filter on right hand side to filter machine list
- Click ‘Save’ or ‘Save And Add Document(s)’
- Save And Add Document(s) will take you to documents list where you can select applicable document(s) to associate to schedule
- Select Documents and Click ‘Save’
- Note: You'll need to save the schedule before you can add a BOM Kit or the estimated resource hours by trade. Simply click 'add' to put in a trade and estimated labor time for that schedule. For more on the Spares Kitting this article.
Pro-Tip: When using the Scheduler Calendar Click & Drag / Drop & Drag functionality, these transactions are not recorded or logged as part of the history. This is due to the frequency with which they occur as well as how often and easily these changes can be made.
Watch a Video on How to Create a Schedule!